We have written about ways to adjust the print settings in Excel 2010 so that all of your columns will print on one sheet, which can be the best solution if your spreadsheet is just barely too large to fit on a sheet of letter-sized paper. But if you have a lot of columns or a lot of data, then this can result in small text that is difficult to read. If you need to keep all of those columns on one page, however, then a better option might be to simply use larger paper, such as legal paper. Fortunately, this is a setting that you can adjust in Excel rather easily. So continue reading below to learn how to change the paper size for a spreadsheet in Excel 2010. Black and white laser printers are good choices for homes or businesses with a lot of printing needs. Check out a good one here.
How to Print an Excel Spreadsheet on Legal Paper
Our article continues below with additional information on printing on legal paper in Excel, including pictures of these steps.
How to Print on 8.5″ by 14″ Paper in Excel 2010 (Guide with Pictures)
Note that individual printers may require additional changes in order to print on legal-sized paper. This can often mean using the manual-feed option on the printer or using a different paper tray on larger printers. Following the steps below will change the paper size setting in Excel, but it may not change the paper size setting for your printer. If your printer will not print on legal paper, then you will need to consult the documentation for your printer model to learn how to print on a paper size other than letter.
Step 1: Open your spreadsheet in Excel 2010.
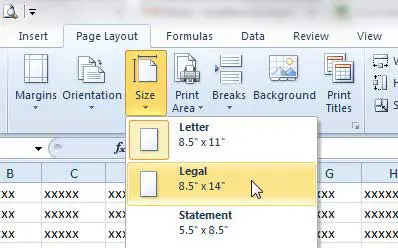
Step 2: Click the Page Layout tab at the top of the window.
Step 3: Click the Size button in the Page Setup section of the ribbon at the top of the window, then click the Legal option.
More Information on How to Print on Legal Paper in Excel 2010
The default print options that you have available to you in Excel include:
LetterLegalStatementExecutiveA5B5A4B4A3PostcardReply PostcardEnvelopesIndex card
You can also choose the More Paper Sizes option at the bottom of the dropdown menu if you want to enter your own custom paper size for your Excel worksheet. The steps above allow you to specify that the current worksheet will print on legal size paper, but what if you would like to specify that the current workbook will print on legal size paper? Fortunately, you can take advantage of a simple trick that lets you apply the same change to all of the worksheets within a workbook. Right-click on one of the worksheet tabs at the bottom of the window, then choose the Select All Sheets option. You can then click the Size button on the Page Layout tab and choose the Legal paper size. Now all of your worksheets will print on legal paper. If you find that you are making changes to your Excel files whenever you open them, then you may want to consider changing some of the default settings. You can find these by going to File > Options and clicking the various tabs on the Excel Options menu. There you will be able to do things like change the default file type, switch the default font, and use a different default view. You can adjust some of the other printing and layout options from this location, including the size of the margins and the orientation of the sheet. Another helpful adjustment when printing Excel spreadsheets is to print the top row on every page. This adjustment can make it much easier to determine what certain data is on additional pages of a printed document.
Additional Sources
After receiving his Bachelor’s and Master’s degrees in Computer Science he spent several years working in IT management for small businesses. However, he now works full time writing content online and creating websites. His main writing topics include iPhones, Microsoft Office, Google Apps, Android, and Photoshop, but he has also written about many other tech topics as well. Read his full bio here.


