Previously, we showed you how to set up and configure a Self-Signed Digital Certificate in Office 2010. Since then, some things have changed in the Office 2016 release. In this article, I’m going to review Creating Self-Signed certs using the latest version of Office.
Setup Self-Signed Digital Certificate in Office 2016 Applications
The Digital Certificate for VBA Projects can now be found within Program Files > Microsoft Office > root > Office16.
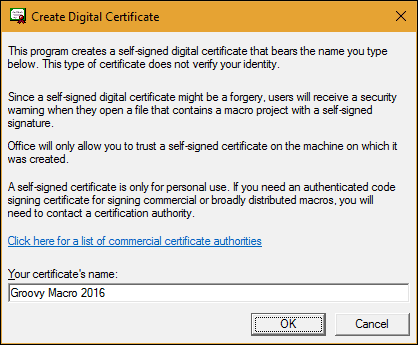
Double click the SELFCERT file, enter a name for your Digital Certificate, then click OK.
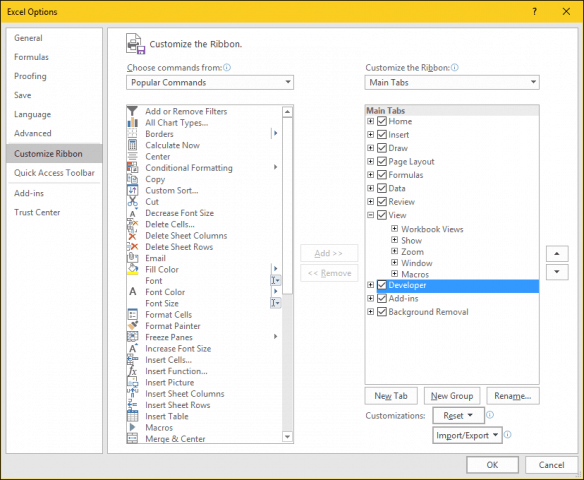
Launch any of the Office applications you would like to use the digital certificate in. For this article, I am going to use Excel. The first thing you will need to do is enable the Developer tab. Click File > Options > Customize Ribbon > check the box Developer then click OK.
Select the Developer tab, then click the Macro Security button within the Code group, select the Enable all Macros radio box, then click OK.
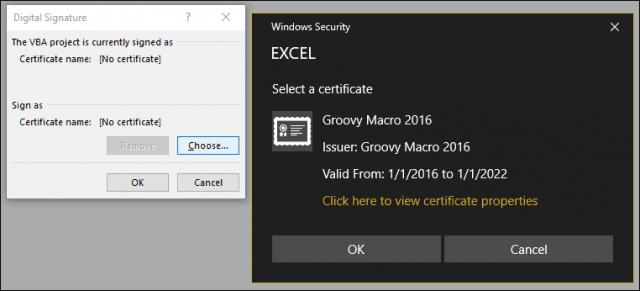
Within the Code group, click Visual Basic. The Visual Basic for Applications component will be launched. Next, click Tools, then click Digital Signature.
Click Choose, the recently created digital certificate will be presented. Click OK, then proceed to save your project.
Ensuring your Macros Work
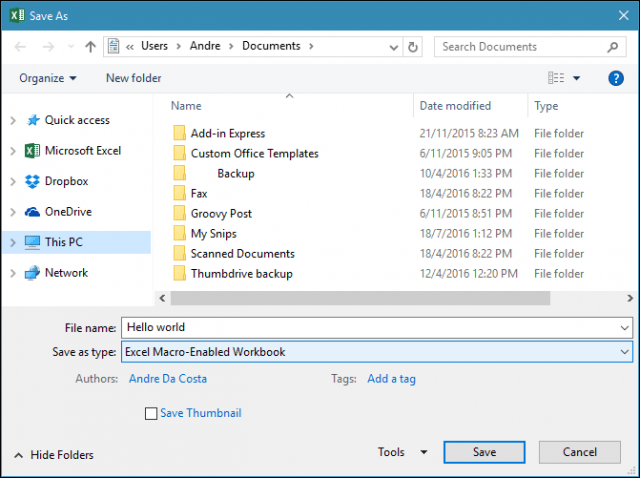
I noted earlier; Microsoft has made security changes to how Macros work in Office applications over the years. Saving your Macro’s is not allowed in a standard workbook or document.
Instead, users must correctly choose Macro-Enabled as the file type when saving.
Users can manage their signed certificate by using launching Internet Options. First, click Start, then type: internet options, hit Enter on your keyboard, select the Content tab, then click Manage Certificates. Here you have the choice of deleting or exporting your certificate for use on another computer.
Check out our previous example of how to set up a handy Macro in Microsoft Outlook for enabling Blind Carbon Copy. We find that a new file created from our template will crash Word when closed without saving under the condition that your document variables are not the last one in the collection (i.e. if your document variable id is equal to the count then that’s ok, if we have another one added and your’s is not the last one, then Word crashes). If we are adding document variables after the file has been signed for the first time and then save again (thus re-signing it), your routine re-uses the already existing document variables rather than creating new (last) ones. Therefore your document variables aren’t the last ones (which you may assume somewhere in your code?). Word crashes if we create a new file from such a template and exit the file without saving it. We can recreate this. However, we can also re-create the fix of removing the signature (and manually removing your document variables which aren’t removed when the signature is removed – shouldn’t it do that?? ). If we only remove the signature and then re-sign it after changing our VBA part and the document variables, it crashes again (suggesting that you’re re-using the variables if found). However, if we manually remove the doc variables and then re-sign, our templates remain stable and don’t crash Word. We can produce a file ‘Before’ and After if you would like to see what this means in reality but it would probably be a good idea to do a screen-share with someone technical to demonstrate. Thanks Kathy “recoverable signature” I had a problem after inserting an image of my signature: “recoverable signature”. this helped resolve that issue: First, I double-clicked the signature line in the saved document with the red text reading “Recoverable Signature”. In the dialog box, there is a warning about the signature. Click “Trust this signature…” https://answers.microsoft.com/en-us/office/forum/office_365hp-word/the-certificate-you-selected-cannot-be-verified/4bb05f5c-9c56-4476-a914-37029321b267 But in order for this to work, the list of Trusted Publishers in the Office Trust Center must include certificates for all publishers you need to trust, including any certificates you created with SelfCert.exe. You need to use the “Internet Properties” dialog you mention in your last step. First export your certificate listed under the “Personal” tab to a .CER file, and then import that file under the “Trusted Publishers” tab. Anyway, I recommend avoiding certificates with Office apps if at all possible. I prefer to use the “Trusted Folders” feature to set up specific areas where macro-based Office documents and apps can be executed without warnings. If you work with Access files in .accdb or .accde format, it is also realistically the only option. Comment Name * Email *
Δ Save my name and email and send me emails as new comments are made to this post.
![]()


