Selections in Adobe Photoshop CS5 provide an added level of customization on top of that which you can already achieve with levels. Selections can be created based upon color, shape, paths and several other tools, and they can be edited and isolated independently of everything else that is included on a layer. This versatility allows you to easily perform actions on a selection that might otherwise require a degree of layer separation that you do not want to or are not able to perform. This includes the ability to change the color of a selection in Photoshop CS5 without changing the color of the rest of the layer. This makes it easy to adjust the appearance of one layer element without having to redesign everything else on that layer.
How to Change Color of Selection in Photoshop
Our article continues below with more information on how to change the color of a selection in Adobe Photoshop, including pictures of these steps.
How to Fill a Selection with Color in Photoshop CS5 (Guide with Pictures)
One nice thing about using the selection utility in this manner is that the selection itself does not need to be only one color. By using the rectangular marquee tool, for example, you could change the color for an entire area, despite the fact that your selection might include multiple layer objects that were originally different colors. This ability gives you an added level of creativity that frees you to design outside of color and shape restrictions.
Step 1: Begin learning how to change the color of a Photoshop selection by opening your Photoshop file in Photoshop.
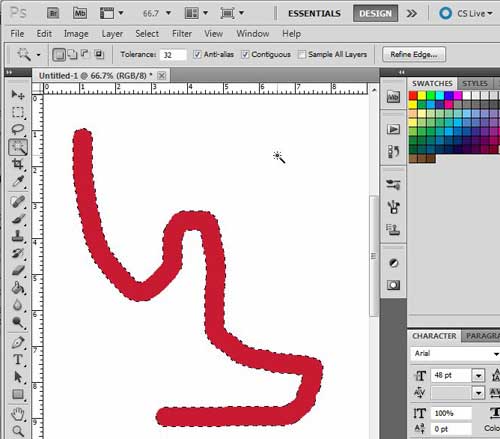
Step 2: Click the layer containing the object you want to select, then use one of the selection tools to select the layer object that you want to re-color.
For example, in the image below, I have used the magic wand tool to select the red brush stroke.
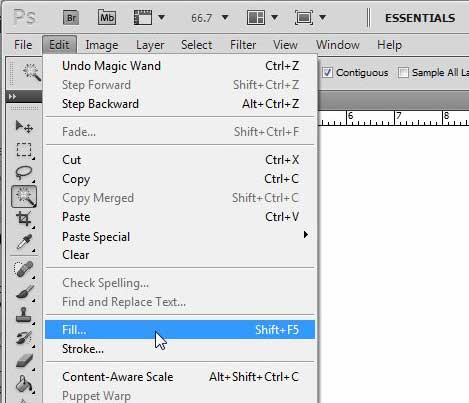
Step 3: Click Edit at the top of the window, then click the Fill option.
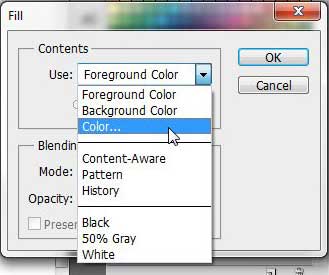
Step 4: Click the drop-down menu to the right of Use, then click the Color option.
Step 5: Choose the color that you want to replace your selection with, then click the OK button.
If you are having trouble matching a color to something else that is already in your image, then the Eyedropper tool can be very helpful. If you select the eyedropper from the toolbox then click on the color in your image it will change the foreground color to the color you want.
How to Use the Blending Section When Choosing a Color in Photoshop
You will note that there is a Blending section at the bottom of the window where you can specify the mode and opacity of your fill color. For example, if you wanted to apply a color but give the appearance that the colors were mixed, you could set the opacity to 50%. You can experiment with opacity and mode combinations to come up with some pretty interesting effects. If you want to change some other aspects of your selection, then you can continue to the section below where we discuss the hue and saturation menu where you can modify the color settings for your selection without actually choosing a new color.
How Do I Adjust Hue Saturation?
If you are trying to further customize the color that you are using, you might be concerned about the hue saturation. While the part of the image that you want to modify is selected, click Image > Adjustments > Hue /Saturation. This is going to open a new Hue/Saturation window with a Hue, Saturation, and Lightness slider. You can adjust these sliders to adjust the coloring of your selection. You can also open the Hue/Saturation menu with the keyboard shortcut of Ctrl + U while you have part of your image selected. After receiving his Bachelor’s and Master’s degrees in Computer Science he spent several years working in IT management for small businesses. However, he now works full time writing content online and creating websites. His main writing topics include iPhones, Microsoft Office, Google Apps, Android, and Photoshop, but he has also written about many other tech topics as well. Read his full bio here.
You may opt out at any time. Read our Privacy Policy


