As a longtime Windows user, you may simply be used to doing this and not looking for a way to expedite the process. Our tutorial below will show you how to take advantage of the ability to customize your Windows 10 startup apps so that these programs open for your automatically every time you restart your computer.
How to Change Start Up Apps in Windows 10
Our article continues below with additional information on changing startup apps in Windows 10, including pictures of these steps. The programs that launch automatically when you boot up your computer are known as startup apps. These aren’t set in stone, and it’s possible to learn how to add to startup Windows 10 apps if you want to have some additional programs run at launch. If you have never customized the startup process for your Windows 10 laptop or desktop computer, then you may be used to closing certain apps when you restart your computer because they are set to launch automatically. Having too many programs at startup can make it difficult to launch or find a particular program that you need, as each time you add a program to startup it means the PC boots a little slower. Since most new computers will have some app settings preconfigured (often called bloatware) you might be wasting time waiting for your computer to start up and also closing the apps that you aren’t using anyway. When your Windows 10 computer starts up after a restart or a shutdown, it’s very likely that a number of applications will launch automatically. These are called startup apps and are meant to ensure that your most important and needed apps are running automatically so that they are ready for use. You can change the startup programs that startup in Windows 10 by clicking the Windows button, selecting the gear icon, choosing Apps, selecting the Startup tab, then managing the apps there. But you may find that some of the apps that are starting up automatically aren’t really necessary and are, in fact, slowing your startup. Fortunately, you have the ability to view and change the startup items in Windows 10 so that you can customize which apps launch automatically. Related Article: If you are an iPhone owner and you have trouble finding apps, then visit the how to stop edit home screen on iPhone guide for a way to fix that.
How to Add or Remove Startup Apps in Windows 10 (Guide with Pictures)
The steps in this article were performed on a Windows 10 laptop. By completing the steps in this guide you will be able to view the apps that are currently running or available for Windows 10 startup. While a lot of what we focus on in this article concerns when too many windows starts opening at boot, there’s nothing wrong with adding programs to launch at boot time if you always launch those programs anyway.
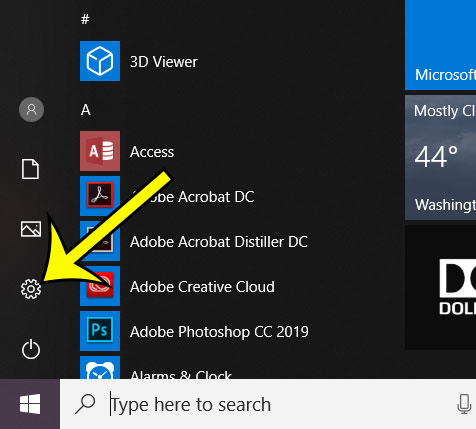
Step 1: Click the Start button at the bottom-left corner of the screen.
Step 2: Click the gear icon.
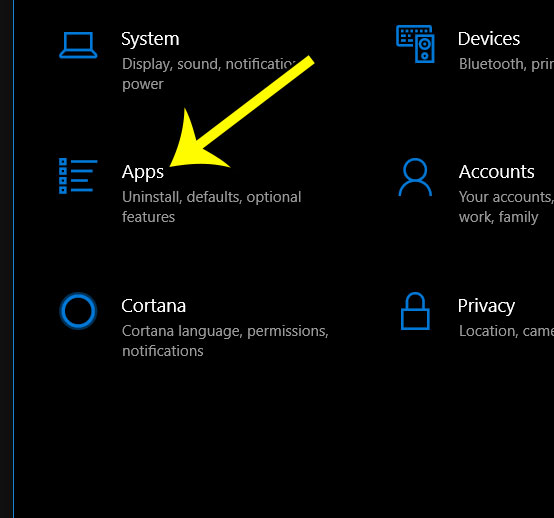
Step 3: Choose the Apps option.
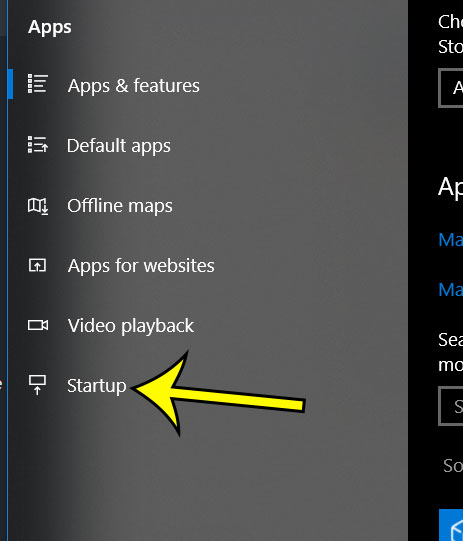
Step 4: Select the Startup option in the left column.
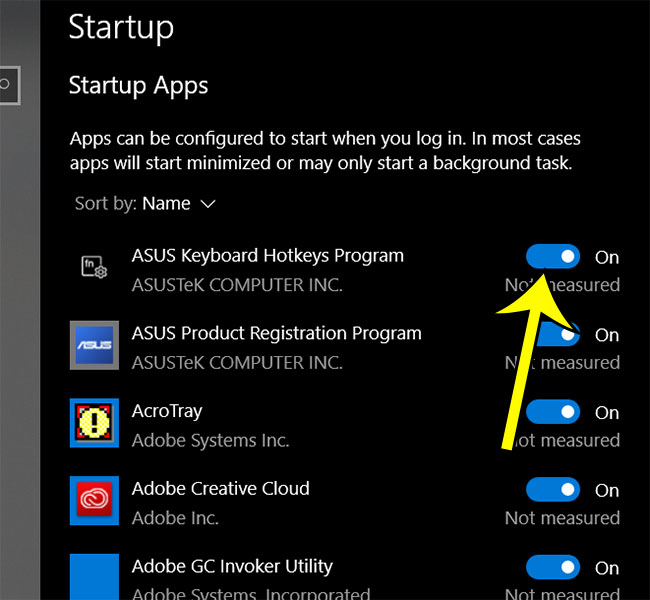
Step 5: View the startup apps on this list. You can stop one of these apps from launching at startup by clicking the blue button to the right of it.
If you use your laptop on a plane, then you might need to know how to turn off a few of the things on it. Find out more about Windows 10 airplane mode so that you can automatically stop all of the services that you need when you are on a plane.
More Information on How to Change Startup Apps – Windows 10
You will see a brief description under some of the listed apps that indicates how much of an impact that app has on the load time for your computer. Apps that have a large impact will cause the computer to take longer to start. Therefore it’s a good idea to limit the number of these impactful apps to only those that are absolutely critical. Many apps that you install will have an option where you can elect whether or not to let that app run at startup. In some cases this option will be checked by default. It’s always a good idea to keep an eye out for options like these as they can have a negative impact on your computer’s performance. If there’s an app that you are always launching as soon as your computer starts, then that could be something that you want to allow as a startup app. You can always choose to enable an app at startup and test it out to see how much it slows down your computer to see if it’s worth it. When you have the Apps menu open in the Windows 10 settings menu there is also a tab called Apps & features. If you select that tab and then click an app in the list you will be able to uninstall that app from your computer. This is a good way to both remove unwanted apps from your computer and free up space if your hard drive is getting full. One other place you can find this information is in the user Startup folder. This lets you view each startup program that is enabled to run automatically on your computer, and it allows you to remove unnecessary programs that startup in Windows 10. To locate the startup apps folders, you can go to these locations: The current user startup folder – C:\Users(YourUserName)\AppData\Roaming\Microsoft\Windows\Start Menu\Programs\Startup or The common startup folder for all users – C:\ProgramData\Microsoft\Windows\Start Menu\Programs\StartUp There you will see some programs that automatically launch when you start your computer. You can also add programs to these apps folder options if you want to make a program run at startup. You will need to open the “Run” window by pressing the Windows key + R on your keyboard, then type shell:appsfolder into the Run dialog box field and press Enter. This opens the modern apps folder, where you will can drag a program shortcut to the particular user startup folder or the common startup folder. I find these startup folders to be an unnecessary navigation path for me most of the time, as the basic “Startup” option can let you do a lot if you want to add app startup options or disable apps from launching at startup.
He specializes in writing content about iPhones, Android devices, Microsoft Office, and many other popular applications and devices. Read his full bio here.


