When you have a lot of printed spreadsheets lying around your workspace, it can be difficult to determine which file a spreadsheet came from. One helpful way to solve this problem is to include identifying information in the header section of your worksheets. An effective way to do this is by inserting the filename in the header, which you can do from the “Custom Header” window in Excel 2013. Our tutorial below will show you how to accomplish this and insert workbook information by selecting either the custom header option or the custom footer option.
How to Insert a File Name Into the Header in Microsoft Excel
Our guide continues below with additional information on how to include a filename in the header in Excel, including pictures of these steps.
Adding a Filename to the Header in Excel 2013 (Guide with Picture)
The steps in our guide below will show you how to modify the header of your Excel worksheet so that the name of the file is included at the top of the page when you print the worksheet. This method uses a variable to retrieve the filename, so it will adjust accordingly if you rename the file.
Step 1: Open your worksheet in Excel 2013.
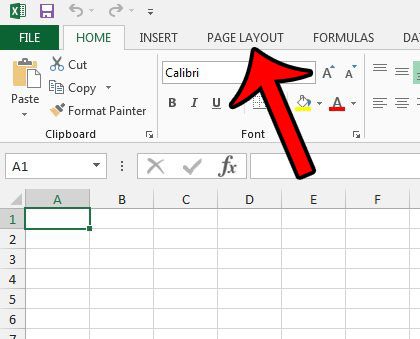
Step 2: Click the Page Layout tab at the top of the window.
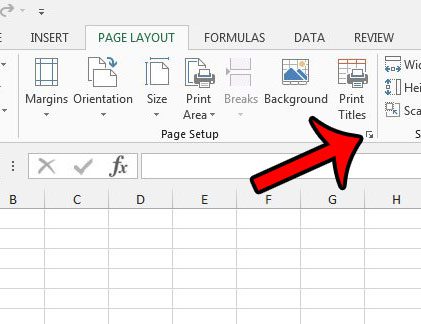
Step 3: Click the Page Setup button at the bottom-right corner of the Page Setup group of the ribbon.
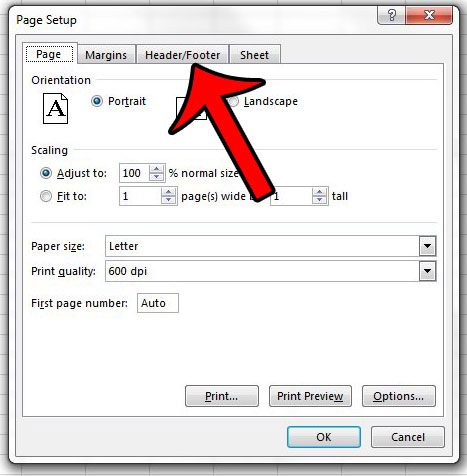
Step 4: Click the Header/Footer tab at the top of the window.
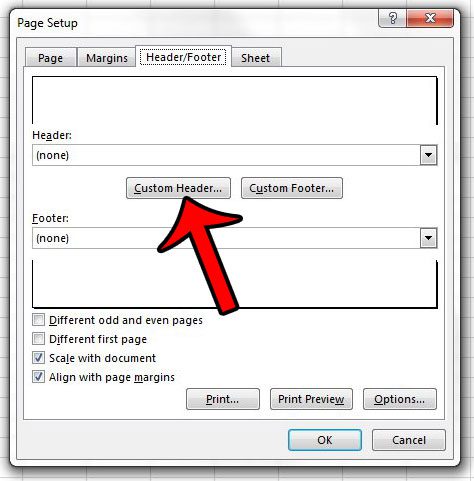
Step 5: Click the Custom Header button at the center of the window.
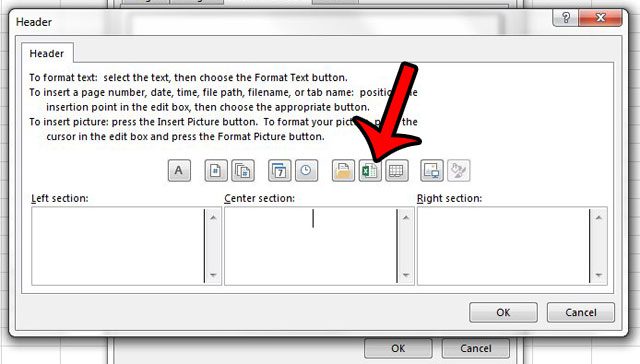
Step 6: Click inside the header section where you want the file name to appear, then click the Insert File Name button. This will add &[File] text to the header section. You can then click the OK button to save and apply your changes.
Our guide continues below with additional information on adding objects to the header or footer in Excel.
How to Add Filename to Footer in Excel 2013
While our guide above focuses specifically on how to insert the filename into the header of your Excel spreadsheet, it’s possible that you might need to place that information in the footer instead. Fortunately, this process is nearly identical. You should now see the &[File] text in the selected section of the footer. Once you click the OK button to apply the change the file name will be added to the footer on each page of the printed spreadsheet.
How to Add the File Path to Header or Footer from the Page Setup Dialog Box
If you need to add more than just the file name to the footer dialog box or the header dialog box, then you might want to use some of the other header and footer tools as well. One of the other buttons in the header elements group or the footer elements group is called File path. If you choose this option then it will add the current file location to the chosen section as well. The steps to do this are: This will add the &[Path]&[File] tags to that section. You can then click the OK button when you have finished adding information to the header or footer.
More Information on How to Add the Filename to the Header in Excel 2013
The steps outlined in our guide above show you how to format your spreadsheet header using the Page Setup dialog box. Some of the other items that you can add to the header in Excel include:
Insert Page NumberInsert Number of PagesInsert DateInsert TimeInsert File PathInsert File NameInsert Sheet NameInsert Picture
There are also options to format text or format the picture that you have added to the header. When you click the Custom Header button or the Custom Footer button on the Page Setup window you will be presented with three sections. These are:
Left sectionCenter sectionRight section
Each of these sections corresponds to a segment of the header or footer on the page. If you add the filename to the left section, for example, then that information appears at the left side of the footer or header. If your school or organization has specific requirements about including a filename in the header or footer, then it’s likely that they will have specific requirements for the section of the header or footer where it’s added as well. If you are in Normal view then you won’t see information on the current worksheet that has been added to the header or footer. You will either need to go to Print Preview from the Print menu, or you will need to change the view. You can do this by clicking the View tab at the top of the window, then clicking the Page Layout button in the Workbook Views group. Now Excel displays the workbook name or the file path if you chose to insert the file path instead. You can stay in Page Layout view if you would like to continue editing your excel document like that, or you can click the Normal button to return to the standard view. Learn how to include the same row at the top of every page in Excel 2013 and make printed multiple-page spreadsheets easier to understand.
Additional Sources
After receiving his Bachelor’s and Master’s degrees in Computer Science he spent several years working in IT management for small businesses. However, he now works full time writing content online and creating websites. His main writing topics include iPhones, Microsoft Office, Google Apps, Android, and Photoshop, but he has also written about many other tech topics as well. Read his full bio here.
You may opt out at any time. Read our Privacy Policy
