Learning how to insert slide numbers in Powerpoint 2010 is especially useful for large presentations where you might constantly be back-tracking to answer questions or refer to information in summary. Page numbers provide an effective means to organize this navigation. Powerpoint is meant to be a program in which you create a visual aid that accompanies you while you are giving a presentation. Presenting can be a bit of a complicated task when you consider that you need to focus on effectively communicating, while also presenting your slideshow and engaging with your audience. When you are juggling this much at one time it is very easy to get lost or distracted. But there are options for adding more organization to your presentations, and one of those options can be enacted by learning how to insert slide numbers into your Microsoft Powerpoint 2010 presentations. By numbering your slides and incorporating that system into your notes, it is possible to give yourself reminders about your presentation to help you if you get lost, distracted, or sidetracked.
How to Insert Slide Numbers in Powerpoint 2010
Our article continues below with additional information on how to add page numbers to Powerpoint, including pictures of these steps. Find out how to create a timeline in Powerpoint using just the tools that are available in the application by default.
How to Add Slide Numbers in Powerpoint 2010 (Guide with Pictures)
In addition to adding slide numbers to your presentation, there are some other helpful things that you can do to keep yourself organized. Powerpoint 2010 has some print options that allow you to print just the notes in your Powerpoint 2010 slideshow. Printing your speaker notes is another great way to aid yourself during a presentation. But we are focused on inserting slide numbers into our slides, so begin by double-clicking your Powerpoint presentation to open it in Powerpoint 2010.
Step 1: Click the Insert tab at the top of the window, which will change the options in the horizontal Powerpoint ribbon.
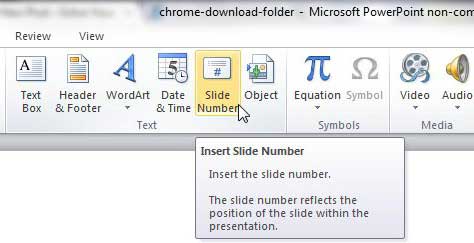
Step 2: Click the Slide Number button in the Text section of the ribbon, which opens the Header and Footer Powerpoint menu.
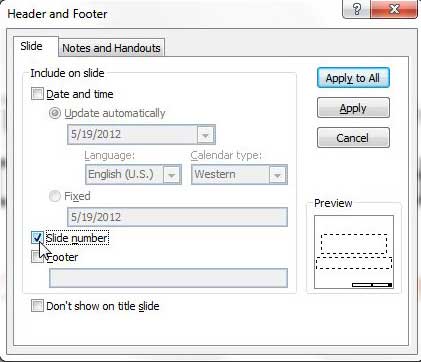
Step 3: Check the box to left of Slide number, then click the Apply to all button to add slide numbers to every slide in your presentation or click the Apply button to only add the slide number to your current slide.
If you take a look at the rest of the options on the Header and Footer menu, you will see that there are some other ways to configure your slide numbers. You can also elect to display the date and time, or you can use the Footer field to add your own customized information to the bottom of your slide(s). There is a Don’t show on title slide box at the bottom of the window that allows you to prevent your slide number from being displayed on your title slide as well.
How Do I Update the Slide Master in Powerpoint?
When you are working with a presentation in Powerpoint 2010 there is something called a “slide master” where you can modify the different templates for various types of slides that you might add to the presentation. You can enter Slide Master view by selecting the View tab at the top of the window, then clicking the Slide Master button in the Master Views group of the ribbon. This is going to add a Slide Master tab at the top of the window. If you select that you will be able to edit the master and the assorted layouts that are applicable to it. When you are in Slide Master view you have more control over where you number slides. You can also click inside each segment of the footer dialog box and add information to that location. So, for example, you could click inside the bottom-left footer section, choose the Insert tab, then select Slide Number. When you add slide numbering to the master layout it won’t open the Header and Footer dialog box like it does when you are in Normal view. If you want to do something like skip the page number on the first slide then you will be better served by going to Normal view and clicking Slide Number from the Insert menu. Then you can check the slide number check box as directed in the earlier part of this tutorial.
More Information on How to Add Page Numbers in Powerpoint 2010
Powerpoint uses slide numbers and page numbers to mean the same thing. Each “page” of your presentation is a slide, so adding numbers to those pages is best described as adding slide numbers. All of these options can also be configured on your notes and handouts by choosing the Notes and Handouts tab at the top of the window instead. When you elect to put slide numbers in Powerpoint they will be added to the bottom-right corner of each slide in the presentation, unless you elect to hide the page numbers from the title page. If you do then the numbering will start on the second slide, with the number “2.” You can hide a slide by right-clicking on the slide, then choosing the “Hide slide” option. If you have hidden slides and you have added page numbers to the presentation then the numbering will not change to reflect the hidden nature of those slides. The numbering will appear to skip when you are giving the presentation. If you select the Design tab at the top of the window you will find a Page Setup group in the ribbon (that isn’t there in most newer versions of Powerpoint.) At the bottom-right of that section is a Page Setup button that you can click to affect various settings for your Powerpoint presentations, including a different starting slide number, or defining a custom slide size for individual slides in your slideshow. Do you need your slideshow to be displayed in portrait orientation instead? Learn how to switch to portrait orientation in Powerpoint 2010 if the default landscape option doesn’t work for your needs.
Additional Sources
After receiving his Bachelor’s and Master’s degrees in Computer Science he spent several years working in IT management for small businesses. However, he now works full time writing content online and creating websites. His main writing topics include iPhones, Microsoft Office, Google Apps, Android, and Photoshop, but he has also written about many other tech topics as well. Read his full bio here.
You may opt out at any time. Read our Privacy Policy


